Photography Cheat Sheet
This postcard is useful for remembering your digital camera settings and getting accurate exposures.
Digital cameras are becoming increasingly complex, especially if you are not taking photos regularly or want to use it in other than automatic mode. These cameras offer amazing capabilities but to get the most from them, it’s good to understand a few photography fundamentals.
There are endless on-line sources for this type of information but when you are out in the field ready to take a photo, you can't look it up on your computer.
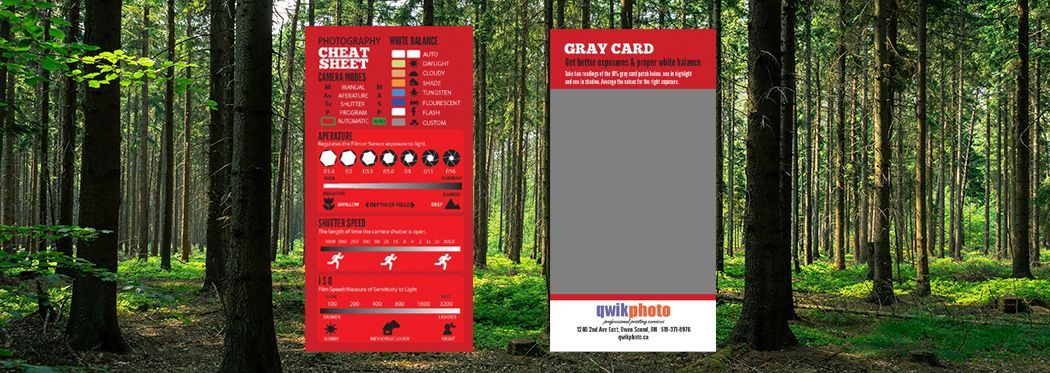
We’ve created a "Photography Cheat Sheet" that helps you remember camera settings and contains a gray card to help you get the right exposure. This card is designed and printed by Qwik Print and is based on some of the many samples found on Pinterest. Stop in at our store to get your's free.
Using the Cheat Sheet
Camera Modes
This is a simple reference to the settings you will see on the control dial of many cameras. Under Manual, you can control both the shutter speed and aperture independently.
White Balance
Digital cameras can correct for differences in the quality of light by adjusting this setting, usually found in the menu system or on-screen controls. Indoors, lights are generally tungsten (warm) or fluorescent (cool). Simply choose an option that best matches the dominant light source or leave the camera in Auto for an automatic adjustment.
Aperture
The aperture settings section illustrates how it affects the amount of light reaching the camera sensor/film and the impact it has on the depth of the field (the range that is in focus). As you decrease the aperture you must slow the shutter speed to obtain an equivalent amount of light entering the camera. The smaller the aperture, the greater the depth of field (area in focus).
Shutter Speed
As shutter speed slows, light enters the camera for a longer period of time. If an object is moving, it can appear blurred if the shutter speed is too slow. To stop action, choose a higher speed and compensate by using a larger aperture. To choose the right shutter speed, consider how fast the subject is moving and the direction. If it is moving toward you, a slower speed can be used than when it is travelling across your field of view.
ISO
Photographic film has a light sensitivity rating called the ISO rating. The higher the ISO, the better the film’s capability to capture images in low light. The ISO settings on your digital camera have the same impact, increasing the sensor's sensitivity to light. As the ISO increases, the film grain increases as does the “noise” or pixellation on a digital camera.
Getting a Proper Exposure
The back of the card contains a gray patch that is equivalent to an 18% reflectance value. This is the “magic” value that light meters use as a baseline when determining the correct exposure setting.
Ever shoot a photo of a winter scene and end up with gray instead of white snow? That’s because your camera or light meter equated that bright white to grey. A similar thing happens when taking night photos and dark skies are no longer black.
These are extreme examples but if you simply follow the camera or hand-held light meter readings it can result in over-exposed or under-exposed photos. It is important to take your readings from the right source, which is why photographers use gray cards.
To get an accurate exposure, point the light meter at the gray patch on the card and note the reading. If the camera has auto-exposure lock, set it. Otherwise, put the camera in Manual Mode, take a reading and change the aperture and shutter speed accordingly until they are balanced. If the subject you are shooting has high contrast, (common on a sunny day) take two readings of the gray patch, one with light falling on it and another in shadow. Average the two readings, and use this as a basis of setting your camera.
Note: It helps to set the camera in Spot Metering mode so you are only reading the gray patch on the card.
Setting Custom White Balance
The gray patch can also be used to set the white balance (warmth of light). Indoors, under incandescent light, the light temperature is lower and appears warmer. Under fluorescent light, photos frequently have a colour-cast, which most digital cameras can adjust for by changing the white balance settings.
The actual steps can vary with the camera but here is the process for setting the white balance on a Canon camera.
- Take a photo of the card making sure only the gray patch is in the shot.
- Navigate through the camera menu to where it says “Custom White Balance”. It will then ask you for an image.
- Select the image of the gray card you just took.
- The camera may ask “Use the WB Data from this image for Custom WB”. Select OK.
- Set the camera’s White Balance setting to Custom. It looks like a square above two triangles.
If this process doesn’t match your camera, check on-line for the steps but in all cases, use the gray patch for taking your readings.